I’ve previously reviewed Usine Hollyhock II which you can read here. It’s currently my primary DAW and I’ve used it to record a number of albums including Assimilation, Invisible Boundaries, The Fair Unknown, Sunday Constitutional, The Girl With the Long Flowing Hair (released on Fwonk), sympathetic vibrations; a number of mixes; songs for Naviar Haiku, Cities and Memory, a remix for Owlbinos of Northfield released on Romeda, a remix on Luke Lund’s Choice of no Choice album on Terranean Recordings plus a number of others.
So I thought a follow up blog post might be useful focusing on how I use Hollyhock II in practice, for example to record my latest album, sympathetic vibrations.
Hollyhock II does have a unique workflow which suits my way of thinking about creating music really well. This workflow combined with the live recording might not suit everybody and isn’t the most efficient for every style, for instance if you’re creating a loop based mix or have lots of midi parts it might be easier to use a more traditional DAW, I would tend to use MuLab for this purpose. That said, the creative possibilities with live recording are immense and offer the opportunity to create unique recordings.
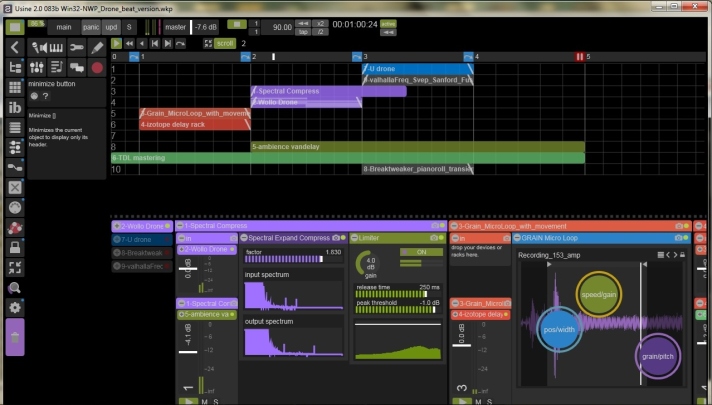
One aspect of the workflow which works well for me is to create racks with different sounds, whether samples loaded into the normal or grain samplers, synths with chord progressions, percusssive rhythms etc. and play around with these racks in different combinations before creating a grid arrangement. You can compare sounds, switch racks in and out as you wish so that you can apply EQ, adjust levels, adjust effects etc. as necessary for the different parts of the song before laying them out on the grid. Once you’ve arranged your grid only those instruments / effects loaded in that section will play and you can’t turn them on and off which is why I find it useful to scope songs before creating a grid and it has lead to the creation of many songs from exploring a few sounds and also a number of mixes when certain parts didn’t work well together and I was able to identify numerous possibilities in different combinations which fitted together as a longer form mix. Once you’ve arranged the grid you can alter section lengths, check your fade in / fade out and timings etc. Here’s an example of the grid arrangement for the Low Earth Orbit version.

Another good tip I picked up from demo songs is to create the first section as a ‘blank’ with say 2 sections duration, this gives a short lead in time to prepare yourself for recording and can be edited out with an audio editor like Audacity. Often the only post processing I do is with Audacity to check levels and amplify if needed, add meta-tags, create mp3s etc.
This is how sympathetic vibrations started. I created a simple progression with Wollo Drone VST and then introduced elements to work with this sound including a granulated field recording, percussive rhythm, a drone type sound created from the field recording and a number of samples processed with delay and reverb to add a background element. I tend to find with this style that fewer, carefully layered sounds tend to work better because it’s very easy to end up with an over cluttered sound that’s just too busy. So I ended up with a number of racks:
- Field recordings processed with the grain microloop patch fed to Izotope DDLY dynamic delay;
- Groove matrix patch with field recordings fed to Subvert;
- Wollo Drone VST fed to a spectral expand / compress patch;
- PadKontrol patch with 16 samples (Glitchmachines, Twisted Brainwrong and 99Sounds) fed to Ambience / Vandelay;
- U-drone sampler add-on.

The grain microloop patch is a granular engine where you can adjust 3 settings of a grain sampler – the starting position / width of the sample; the speed / gain; the grain / pitch. You can do this with automation curves, live edits during the recording or physics to control 2 of the parameters. This is very interesting functionality, effectively two balls in a box are assigned to the speed/gain and grain/pitch parameters and you adjust the speed, elasticity and friction to determine how the balls bounce around inside the box and hence how parameters change. This gives a unique sound as each recording is likely to be different due to the different starting positions and amount of movement used. Sometimes using a slow setting and turning physics on and off during the recording gives smoother transitions than manually editing with a mouse. I used both manual editing and physics on this album.

I was lucky enough to get Izotope DDLY dynamic delay for free a while ago, it’s an excellent effect which has 2 delays, either analogue or granular each of which has a filter but also you can set which part of the sound frequency each delay applies to. This means you can apply a granular delay to the bass frequencies or top end for instance. I used this with the granular sampler experimenting with the settings to create a sound that I was happy with.

Groove matrix is a patch that allows you to create rhythms from samples. You can load 4 samples, set the length, pan, pitch, gain and arrange them in the equivalent of a drum sequencer. Global size, division and swing parameters help shape your sound and if you’re feeling adventurous the randomise pattern option can be a great starting point. I really like the flexibility this offers, you can use anything you like from drum samples to percussive samples to field recordings which shape the feel of the resulting rhythm. I also used the randomise button to start with and then used it extensively during the recording of the album.

Subvert VST by Glitchmachines is a 3 channel distortion processor based around 5 effects – multimode distortion, FM ring modulator, digitizer, metalizer and multimode filter. It has three channels of each effects chain plus modulation options with 2 envelopes and 4 LFOs and EQ too. It comes with a lot of presets and I’ve had excellent results with these so far and I used one of the presets in this instance. I still need to have a good play with this and create my own presets too.

Wollo Drone is a free VST created by Erik Wollo which is a virtual analog synthesizer that combines analog style sounds with on board effect processors and creates some excellent drone sounds as its name suggests. This is fed to the spectral expand / compress patch to give movement in the sound but also a subdued or distant feel too.

padKontrol is the Hollyhock II equivalent of a trigger pad, you can load up to 16 samples and change the gain / pitch. It can be controlled by midi, touch OSC or the old fashioned way of clicking on the sample. I’ve used Glitchmachines samples, Twisted Brainwrong samples and 99Sounds samples fed to Ambience and Vandelay VSTs. I find using this patch allows for a good variation of samples that you can trigger manually and it’s easy to trigger them in quick succession, separately or more layered.

Ambience is a great free reverb VST effect which can produce everything from small room sounds to large churches.

Vandelay is a delay effect by Klevgrand, it has 3 bands with independent delay, feedback and modulation settings. I really like the interface, you can quickly create some very unusual delays from the old fashioned tape style delays to dub type delays. I wanted more of a simple delay for this song and a large reverb.

The U-drone add-on is one of my favourites. You load a sample and then ‘play’ it at any pitch from C0 to B6 by selecting the appropriate circle which switches notes on for as long or as short as you wish and then off when you click again. This offers loads of possibilities from chord type sounds, bass drones to multi-layered drones. Depending on the length of the loaded sample you can sometimes get interesting artifacts or high pitch tweet / clicks layered over bass sounds. Feeding the output to Ambience / Vandelay really expands the sound.
At this point I thought about how to arrange the song. I went with the grain microloop to open followed by the synth and percussion fading in leading to a part with the random samples triggered and drone for a contrast then returning to the synth and grain microloop to fade out.
Once I’d created the initial song, the thought that everything resonates, everything vibrates and the varying rate and mode of vibrations accounts for everything that is manifest kept occurring to me. This formed the title of the song so I took this concept and thought that by changing different parameters I could create different versions or different perspectives of the same song. So that’s what I did, by changing timings and various parameters I came up with a few different versions. I then started to change a few other sounds, for instance substituting Wollo Drone, using the Fugue machine add-on and using a rather excessive effects chain comprising of Valhalla Freq Echo, Klevgrand Svep, Sanford Reverb and Fusion Delay.
That’s what is so brilliant about Hollyhock II, whereas with a traditional DAW you seem ‘locked in’ to the song you’ve created, Hollyhock acts more like an instrument – an excellent description by Kees De Groot (Groovehare) – which really encourages you to experiment, change sounds or settings and create something different. Anywhere from slightly different to entirely different. The live recording aspect also offers opportunities to create many different versions. Sometimes this is frustrating when you’re not happy with a transition but can’t reproduce the manually triggered sounds that you’re happy with no matter how many times you try. The big plus side is this doesn’t happen often and is more likely to result in an album worth of material from exploring and developing themes. Well it does for me anyway.

I recently got the Air Music Technology Xpand!2 workstation for £1 from Plugin Boutique which is an absolute steal and if you’re mega quick you can get it too until 5th September. Now I know some people don’t like using presets but this has loads of great quality sounds – and some not so great but these are in the minority – in loads of different categories so it’s a really quick way of getting great sounding strings, basses, pads etc. It offers lots of opportunity to shape the sounds through modifying envelopes and using in-built effects and you can layer up to 4 samples to create your own sounds. It is incredibly light on CPU usage and of course you can also shape the sounds using any other effects you see fit.

The Fugue machine add-on is something I’ve been playing around with lately, I created a fairly simple arpeggio as a midi pattern and then the fugue machine is a sequencer which applies delays, timing patterns, octave changes and forward / reverse patterns to create a classical type of sound. I’ve had great results so far but have yet to explore it’s full potential.
Another excellent feature of Hollyhock is its modular nature. This means features such as send/return might not be built in but they are very easy to establish by creating an audio bus on each audio out channel and then selecting this audio bus instead of an audio in on an effects rack for instance. Just make sure that you name them in a way you’ll recognise otherwise it gets very confusing. I probably should add volume mixers too which would give additional control over the standard input / output levels.
I experimented using this fugue add-on with a rather excessive effects chain as a send/return effect in addition to the series effect of Ambience / Vandelay.

Valhalla Freq Echo is a very interesting free delay effect from Valhalla which is a frequency shifter and analogue echo which can be very subtle or complete psychedelic bonkers-ness. They also make a number of reverb and delay effects which are very reasonably priced and definitely on my wishlist.

Svep is a flanger/phaser/chorus effect by Klevgrand which has a brilliant UI like Vandelay which encourages you to play with it and see what happens rather than read the manual. Which is what I did.

Sanford Reverb is another excellent free reverb effect which has a great sound, is easy to use and has a cool freeze feature. If that’s not enough it’s also light on CPU usage.
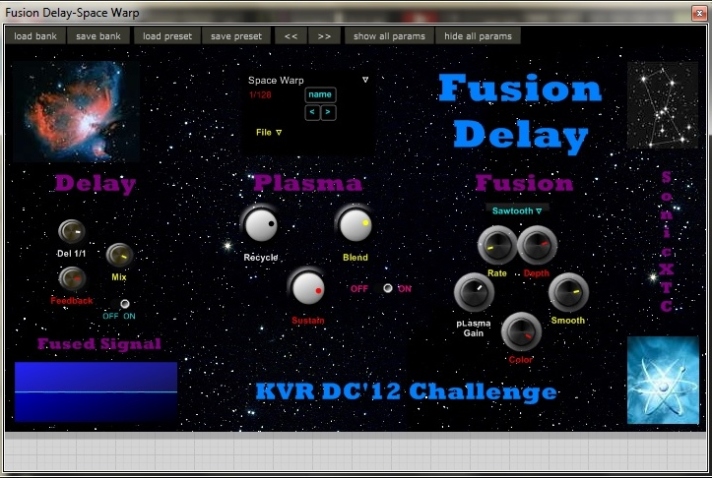
Fusion Delay was created for the KVR ’12 developers challenge and is an awesome free delay effect by Sonic XTC that has a plasma function which separates the sound into component frequencies and blends it back in with the delayed signal. If you get the timings right this dither effect can sound really good.

I also used Breaktweaker by Izotope on the Low Earth Orbit version. This was heavily discounted recently at Plugin Boutique and I couldn’t resist. It’s like a drum machine but that’s massively underselling its potential, it has so much more to offer such as slicing to create rhythmic effects and evolving beats. It’s controlled by midi so has potential to be controlled by some of the many patches / add-ons in Hollyhock for even more flexibility. So far I’ve mainly experimented with presets to get the hang of it and I know I’ve not even scratched the surface with it’s potential.

I’ve processed this with Transient by Sleepy Time Records, Breaktweaker sounds great by itself but the transient shaper gives it a little bit extra. I’d also like to say kudos to Plugin Boutique, when the deal I purchased expired their subsequent deal cost more but had 4 bundled expansion packs and they made these available to previous customers. Such excellent customer service is very rare these days.
By this time I’d made these changes and re-recordings ending up with 11 versions which made the cut for the album. One big disadvantage with live recording, especially when you use automation with physics on filters or randomly triggered samples for instance is that it can play havoc with the levels and is sometimes very hard to predict. Whilst I could use something like a limiter or auto-leveller I tend to use a less technical approach of experience and trial and error to reduce levels and then check initial recordings in Audacity. Most of the time they are there or thereabouts but occasionally they are way off like this early version of Low Earth Orbit where the start was too quite and something odd is going on when Breaktweaker enters causing a peak in the level and then is also a bit quiet.

The other comment I’d make is that I don’t tend to separately master songs instead I use a ‘mastering’ rack and do it all as part of the recording. This is partly because I don’t want to over-produce the live recording and partly because I’m in no way an audio engineer and still learning lots about EQ etc. That said, I’ve found that Ferric TDS, Density MKIII and TDR Kotelnikov Compressor give me a sound that I’m really happy with. It’s not really mastering, more of a polish I’d say.

Ferric TDS is a tape dynamics simulator by Variety of Sound and it is excellent for adding the sort of dynamic effects that you get from top end tape gear. It adds crunch and presence and can be quite subtle but is an excellent effect.

Density MKIII, also by Variety of Sound, is one of my absolute favourite VST effects and unbelievably it’s free. It’s a compressor which adds amazing clarity and depth to your sound. In fact I’d recommend checking out all of the Variety of Sound plugins because they have produced an excellent range although I think they are only available as 32 bit versions.

TDR Kotelnikov by Tokyo Dawn Labs is a mastering compressor which has a very clean and transparent sound. It could be that I don’t really need both Density MKIII and this one but they seem to work together really well. It is available as a free and a paid for GE version. I’d also recommend their other plugins, Nova and Slick EQ which are both excellent EQ effects. The GE versions are also on my wishlist.
On the subject of EQ, my use varies a lot. With this type of sound where there aren’t many elements and I want as natural sound as possible with long delay tails I often don’t use too much if any when I think it’s not really needed. Other times when I use multiple layers or sample loops there tends to be a clash of frequencies and I’ll use EQ a lot more. It’s an area I’m learning about all the time, I really need to look at some of the visual mastering tools too which look easy and straightforward to use.

Great review, I’m enjoying Usine’s workflow. I went looking for the fugue add-on but it doesn’t seem to be available. Thoughts?
Sorry for the delay, it took some finding! The creator of fugue, Drakh, has a repository on GitHub which can be found here. The fugue patch is in the sequencers folder. There’s some other cool stuff in there too like circleseq
i’ve sympathetic vibrations (eye of the storm version) in the ear , really a agonizing part of a strange movie, like it !
0 Pingbacks